Showing posts with label Halloween. Show all posts

Wednesday, October 9, 2013

Kids Halloween Party

B has always wanted to throw a costumed Halloween party so we finally did it this year.  I don't know who had more fun - me planning, buying and creating for the party or the kids at the party.  :o)  When we got down to the wire, the hubs and I were pretty frantic right before the party started.  Thank goodness my BFF showed up to finish the cupcakes for me and one of the moms stayed during the party to take pictures.  I ran up for a shower 10 minutes before the party started!

The first thing I did was create a Halloween Party Ideas board on Pinterest.  I definitely did not use all the ideas that I pinned but if I did not have them all in a central location, I'd never remember them.  Although we purchased so many party items from our local Dollar Tree, the gas used during the repeated trips up there probably negated the fact that everything was $1.  LOL

I downloaded and printed the skull and candy corn invitations from Do It Yourself Invitations.  I would have preferred an invitation that was spookier or at least was mostly black and orange, but B liked this one the best, so we went with it.  I printed them on card stock, put them in manila envelopes that B decorated with spiders, ghosts, etc. and we hand-delivered them.  In addition to day, time and RSVP info, I put this on the cards:

We're having a party! We hope you can come.
Get dressed in your costume. We'll have lots of fun!
  
The party was in between lunch and dinner, so I only provided a few snacks and cupcakes.  B wrapped mason jars with white crepe paper and added google eyes for mummy glasses, writing each guest's name on the back.  I cut up carrots, red pepper and broccoli and served it with my go-to dip: bottled ranch dressing, a minced clove or 2 of garlic and dried dill weed.  Make it at least a couple of hours before serving to get the flavors to meld.  I also made Money Saving Mom's Pumpkin Chocolate Chip Muffins (a fav in our house) and witch's brooms made out of pretzel sticks and cheese sticks I cut into fringe.

I made Joy the Baker's Brownie Bottom Ice Cream Cupcakes with cookies n cream ice cream and topped them with a dollop of buttercream icing instead of whipped cream.  I needed something more solid to hold the cupcake topper, The Partiologist's Stained Glass Pumpkins.  While I showered, my BFF made the pumpkins.

For the goodie bags, I was proactive and went to Walmart last month to take advantage of the back to school sales. I bought each child a box of colored pencils, a box of crayons and split 2 boxes of 20 pencils each among the 8 guests - all that cost $1 per child.  I know all the children had just bought supplies for school, but all those supplies were taken to school; these goodie bag items were for use at home.  I had originally planned to use a pack of goodie bags I bought at a yard sale for $0.50, but I could not fit the Honeycrisp Apples in them, so I got cute jack-o-lantern bags from Walmart for $0.97 each.  B filled the goodie bags and made tags for them with each guest's name.

Now onto the activities.  We checked Halloween CDs out of the library and had music playing when the guests arrived.  B held a Monster Mash dance party in the front room until everyone had arrived.  Then I had all the kids sit down for the mummy game.  I bought a bag each of Halloween erasers, vampire teeth, glow-in-the-dark snakes and bugs at the Dollar Tree and wrapped them up inside 3 or 4 rolls of white crepe paper.  I worked on that for 2 hours, while watching TV, the night before the party.  Sometimes there was only 1 foot of crepe paper between doodads and sometimes there was 5 feet between them.  Each child took a turn unrolling the crepe paper until they got a doodad, ripped off the crepe paper they'd unwound and wrapped it around themselves.  Then they passed the ball to the next child.  You can see B, above, with paper wrapped around his head and in his mouth are a pair of vampire teeth.  He had gotten sweaty in his Angry Birds costume while dancing, so I made him take it off to cool down.  Each child collected 4 or 5 doodads and then we put them in their goodie bags for safe keeping (that's why B labeled each bag with a name).

By the time the mummy game was over, Miss Lyn and Francesca, our face painter and balloon artists, had arrived and set up.  The kids were not interested in face paintings to begin with but they were enamored with the wonderful balloon creations the ladies made!  Snakes, horses, light sabers, a green pig to go with B's Angry Birds costume, an octopus and many more.  Anything the kids asked for, they could make.  Below you can see B's face painting - very sinister looking and exactly what B asked her to do - and holding his Angry Bird pig while in costume.


Once everyone received a balloon creation, I herded the kids outside to decorate pumpkins while they took turns getting face paintings.  I bought 3 packages of 6 jars of paint, some brushes and 2 packages of glitter glue pens at the Dollar Tree and small pumpkins from a local farm.  The kids had a great time painting Count Pumpcula, Darth Vader, a Mincecraft Creeper, a fiery graveyard of zombies and more on their gourds.

Some of the kids finished their pumpkin painting early and we had a pumpkin roll game.  Two opponents had to roll their pumpkin across the yard using a broom.  It proved pretty difficult for all the kids except one - he dominated this game.  It didn't matter which pumpkin nor which broom he used, he just flew down the yard!

Once the pumpkin and face paintings were all done, I handed out cupcakes and we all went outside to eat them.  Then we all went back inside to wash up.  B had requested that his guests bring their scooters and helmets to the party, so after washing up, we all went into the alley out back and scooted some of that sugar off.  I had let all the parents know that we would be in the alley at the end of the party so they should come around back to pick up their kids.

Everyone had a great time and I'm so glad we did this!

Sunday, October 14, 2012

Halloween Decor

Inspired by Pinterest, B and I decided to decorate our front door for Halloween this morning.  So fun!  He decided how he wanted the face to to look and I pulled out the door sting from the basement, rolled it up and used it for the hair.  We have no overhang on the front door.  So, if it rains between now and Halloween we'll have to remake the face.  But we're OK with that!


Friday, August 10, 2012

The Changing of the Mind

In May, B said to me, "Mom, I've changed my mind on what I want to be when I grow up.  A bounty hunter is too violent.  I think I want to be a dancer or a cartoonist."  My reaction:


Hehehe.  His mind will change over and over again.  And not just during childhood.  How many of us adults have changed our minds or still don't know what we want to do or what our calling is?  But whatever he does, I know God had a plan for him and he will do great things with his open mind and open heart.

Every November 1st, B announces what he is going to be for Halloween next year.  And every 10-14 days, he changes his mind.  Some years it's a different costume every change, some years he goes back and forth between a half dozen or so costumes.  Well, this past November 1st, he announced he was going to be a crash test dummy for Halloween 2012, complete with nude-colored morph suit, and he has stuck with that idea.  That is, until two days ago, when he and the hubs were on YouTube and found several videos regarding homemade Transformer costumes.  Have you seen these?  I hadn't but they are really cool!  If you go to YouTube and type in "homemade transformer costume" there are a ton of them!

Now B wants to make a Transformer costume, fold himself up into the vehicle form at each house he trick-or-treats at, have the hubs or I ring the doorbell for him and wait until the homeowner opens the door to transform and say, "Trick-or-treat!"  B has narrowed down his choices to two:
  1.  Fighter Jet
  2. Tank
I have decided not to stress over nor worry about his costume this year.  I told him if he wants to do this, then it is up to him to decide what materials he needs and to build it.  I have done it for 10 Halloweens and it is time to pass the torch!  I'll let you know in November what happened...


Friday, October 28, 2011

DIY Sock Monkey Costume - Pictorial Instructions

From left to right: Zach, Bob, Babe, Stephanie, Smith
B loves sock monkeys!  He asked for 1 the Christmas of 2009 and was so thrilled to get him.  B named him  "Bob".  We were floored at his name; It was the 1st time B had named anything with an actual name.  Up to that point, anything he'd named was a literal or descriptive name.  A brown bear was named "Brownie", a frog was named "Froggy", etc.  Then Bob got a wife, Stephanie, and they got a child, Babe.  Then a pirate named Captain Sockbeard, nicknamed Smith, joined the family as Bob's brother.  B decided Smith needed a husband, so Zach joined the family.  Earlier this month, Harold the purple sock hippo joined the family.  One of his arms fell off, so he is not ready to be photographed.  The hubs will be sewing the arm back on this weekend.

Starting November 1st of every year, B starts telling me what he wants to be next Halloween and changes his mind at least 3 times a week.  By the 2nd week of October I told him he needed to decide once and for all and there were no takebacks.  He decided on being a sock monkey.  Much to my surprise, I could not find a single company that makes sock monkey costumes for kids!  You can get them for babies, toddlers and adults, but nothing in between.  So, I had to make one.  In my opinion, the head of a sock monkey would be the most difficult part.  Thankfully, I did not have to worry about that.  Ben's fabulous godmother, knowing his love of sock monkeys, had given him a Winter sock monkey hat last year and Ben wanted to wear that as the the head of his costume.  Sold!


Hat from his fairy godmother.
Supplies I used:

  • A light grey set of sweats from Walmart.  I thought a charcoal or chocolate color would be better to match the brown in the hat, but B wanted the light grey.
  • One sheet of white felt
  • One sheet of red felt
  • A grey, long-sleeved t-thirt
  • Plain, white socks without colored heels or toes
  • Sewing supplies - pins, needle, thread, marking pencil
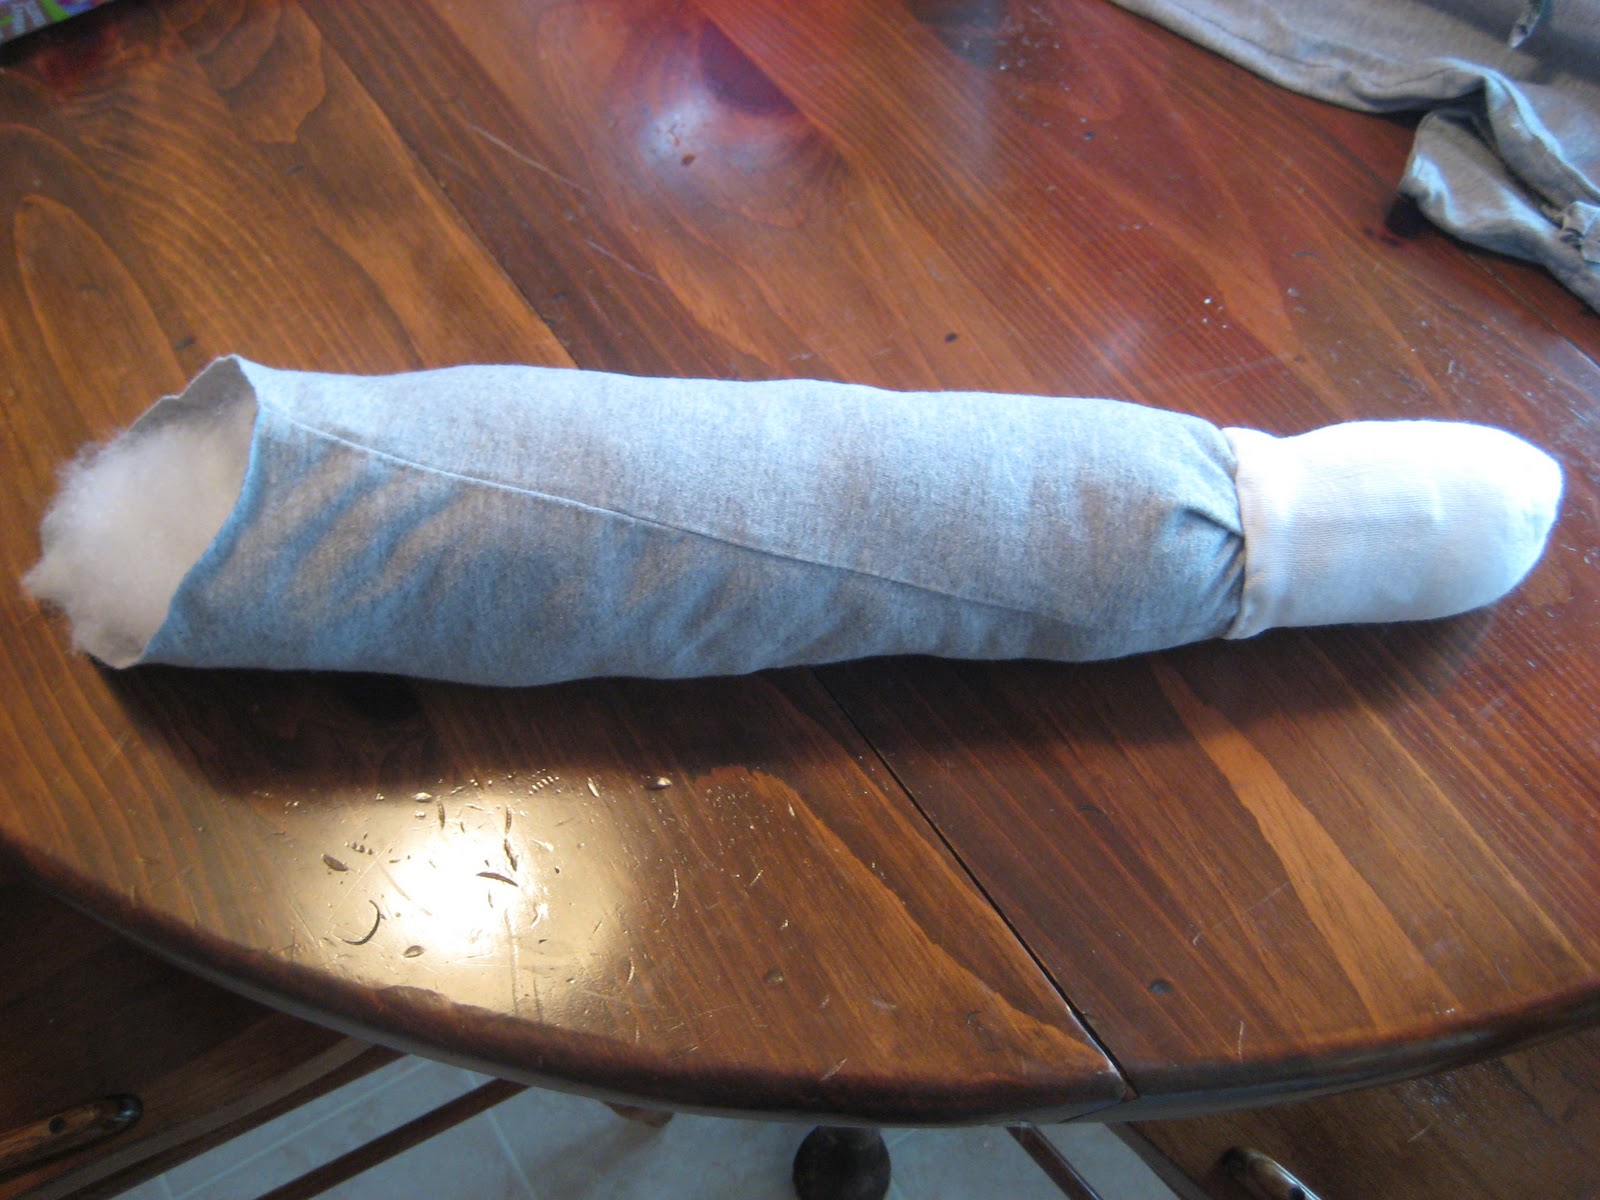
B wore this shirt last Fall and Winter but it's too small for him now.  I cut off one the arms for the sock monkey tail.
I cut off the heel and ankle part of a sock to use as the end of the tail.

I folded over the cut end of the sock and ironed it to hold the crease in place as I sewed it onto the end of the tail. 
The tip all sewed onto the tail.
I filled the tail with fiberfill
And sewed the tail shut.
I measured the white felt next to the tail to see how big a piece I needed for the butt. I marked my cut line with a blue cloth pencil and cut off the material below the blue line.
The material above the blue line - I folded it in half top to bottom...
...and then in half, again, side to side.  I had to use pins to keep it folded.
I used the blue cloth pencil again to mark the arc I needed to cut off to make the white portion of the butt and then cut it off.
After cutting, I removed the pins and this is what it looked like.  I could not have cut it as evenly if I had not done the folding.
The white oval was 7" tall in the middle, so I cut a 3" tall piece of red felt and cut the sides off where the corners met the white on the sides.
The I folded the red felt into 4th like I did with the white, marked my arc and cut.
I laid them out and pinned the red to the white where I wanted it.  I sewed the red felt onto the white with red thread and then sewed the white onto the back of the sweat pants with white thread.
I am a beginning sewer.  To make it go by faster, I weaved the needle 3 or 4 times through the materials before pulling the needle and thread all the way through.
Here is the butt all sewn on!
The sewn end of the tail was so long, I folded it over with a few stitches before sewing it onto the butt of the sweat pants.
The tail is all attached!
I put a pair of white socks on B's hands and marked where his thumbs connected to his hands.  He wanted to have his thumbs out of the socks to better hold his trick-or-treat bag.
I cut a little hole where the Sharpie mark was.
I cut the toes off of a pair of socks for the bottom of his legs.
Here is Bob and B in his costume. He put on the sweat shirt, as is, the sweat pants, the socks on his hands, a pair of socks on his feet and the pair with the toes cut off over the bottom of the sweat pants.
Here he is from the back.  The hubs said he should tuck the sweat shirt into the pants to better see the tail on Halloween.
Here he is scootering around at our Homeschool Halloween party yesterday.
I started on the costume around 4pm and was done by 8pm.  However during that time, we ate dinner and I took several breaks to walk around the house and give my old, hunched-over back and eyes a break.  ;o)  So it was probably took me 2 actual hours of working.